
Install Stable Diffusion with Automatic1111
Ever wondered how to blend art and technology seamlessly? Say hello to "automatic 1111," your new go-to tool for crafting stunning images with the help of artificial intelligence. Whether you're dipping your toes into digital art or looking to explore the vast ocean of AI-powered creativity, this guide is your ticket to getting started with stable diffusion on your Windows PC. So, let's not wait any longer and dive into the world of AI-driven art creation!
Introduction
"Automatic 1111" isn't just another app; it's a gateway to unlocking limitless creativity through stable diffusion, an artificial intelligence technique that transforms your ideas into breathtaking visuals. Imagine conjuring up any image you can think of—fantastical landscapes, futuristic cities, or even unique portraits—all with a few clicks. Ready to turn your imagination into reality? Let's get you set up!
Systems requirements
Your PC should at least run Windows 10 or higher with a Nvidia video card (GPU) with 4 GB VRAM or more. Note that an integrated GPU will not work.
Installing on AMD GPU
AUTOMATIC1111 does not officially support AMD GPUs, but it is possible to make it work if you are tech-savvy or willing to try. See the unofficial installation guide on the official GitHub page.
Installation steps
Step 1: Install python
You will need Python 3.10.6. (DON’T use Python 3.11 or newer) There are two ways to install Python on Windows
Option 1: Install from the Microsoft store.
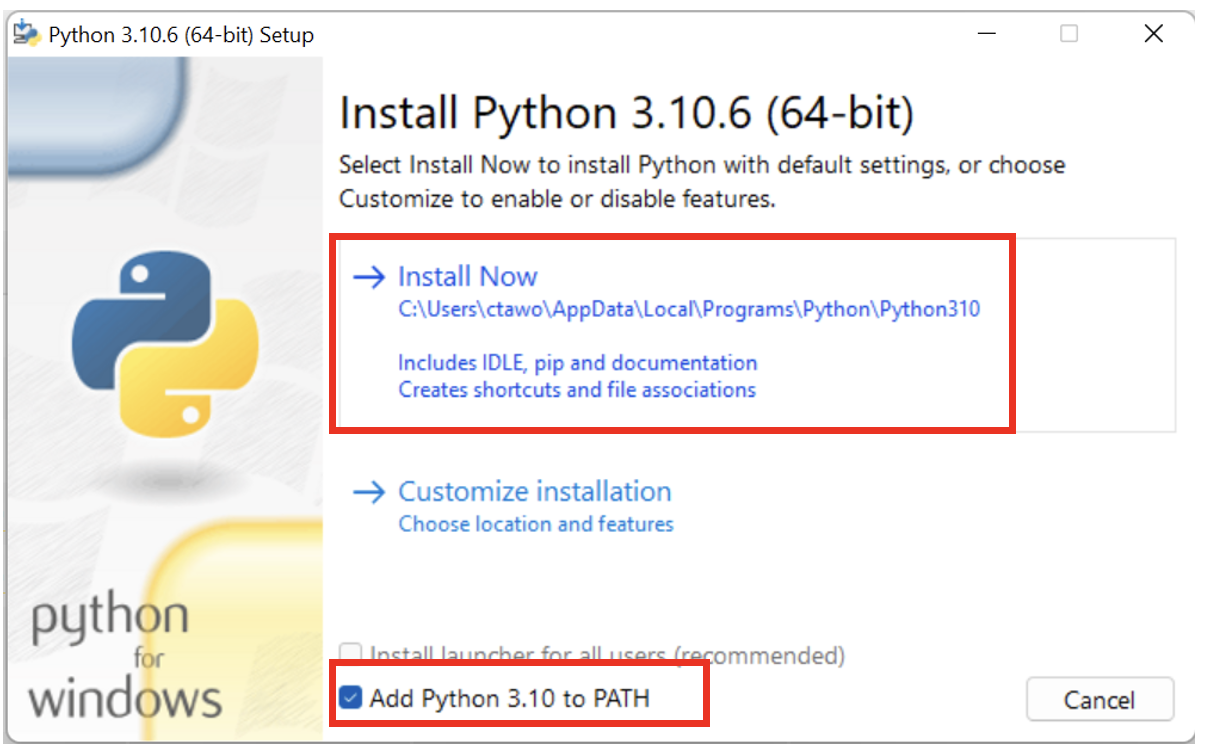
Option 2: Use the 64-bit Windows installer provided by the Python website. (If you use this option, make sure to select “Add Python to 3.10 to PATH“)
I recommend installing it from the Microsoft store.
First, remove all Python versions you have previously installed. You can do that in Control Panel → Add or remove programs.
Visit Python 3.10 on Microsoft Store and install the Python software.
This step is most likely to go wrong. Let’s do a check.
Press the Windows key on your keyboard and type “cmd” to find a program called “Command Prompt”.
Open the Command Prompt App. You should see a black terminal window.
Type “python” and press Enter. You should see you see it prints out Python 3.10. This tells you your Python is installed correctly.

Now you can close the Command Prompt App.
Don’t proceed to the next step until you get Python 3.10 installed correctly.
If you don’t see Python 3.10 running, try
- Restarting the PC
- Removing all the previous versions of Python and reinstalling from the Microsoft Store
- If the one from Microsoft Store doesn’t work for you, remove it and try the one on the Python website.
Step 2: Install git
Git is a code repository management system. You will need it to install and update AUTOMATIC1111.
Go to this page to download the windows version.
Open the installer. Click Install to accept the license and install the software.
Follow the instruction to complete the installation.
Step 3: Clone web-ui
This step downloads the Stable Diffusion software (AUTOMATIC1111).
Press the Window key (It should be on the left of the space bar on your keyboard), and a search window should appear. Type cmd.
Click on Command Prompt. The command prompt window would show up.
First, make sure you are in your home folder by typing the following command and then pressing Enter. (Tip: You should be able to use right-click to paste in Command Prompt.)
You should see your prompt shows something like C:\Users\YOUR_USER_NAME>.
Next type the following command and press Enter to clone the AUTOMATIC1111 repository.
A folder called stable-diffusion-webui should be created in your home directory.
It’s ok to clone the repository in a different folder instead of %userprofile%, as long as you can find the newly created stable-diffusion-webui folder. You will need to change the folder location accordingly in the following steps.
Step 4: Download a model file
Next, go to the newly created folder in File Explorer. Put in
in the address bar and press enter.
Navigate to the folder models and then Stable-diffusion. You should see a file Put Stable Diffusion checkpoints here.txt like below.
Download the Stable Diffusion v1.5 model checkpoint file (download link). Put it in that folder.
Step 5: Run webui
Now in File Explorer, go back to the stable-diffusion-webui folder. That is, go back up two levels or type
again in the address bar.
Find a file called webui-user.bat. Double-click to run and complete the installation.
This last step is going to take a while. When it is done, you will see a message
like the one below.
In your web browser, go to the URL
You should see the AUTOMATIC1111 webui! Put in a prompt (e.g. “a cat”) and hit Generate to test if Stable Diffusion is running correctly.
When you are done using Stable Diffusion, close the cmd black window to shut down Stable Diffusion.
To rerun Stable Diffusion, you need to double-click the webui-user.bat.
Options
You can speed up Stable Diffusion with the --xformers option. If you have less than 8 GB VRAM on GPU, it is a good idea to turn on the --medvram option to save memory to generate more images at a time.
To enable them, right-click on the file webui-user.bat and select Edit. (You may need to select “Show More Options” first if you use Windows 11).
Replace the line
With
Save and close the file.
Double-click the webui-user.bat file to run Stable Diffusion.
Additional arguments
Use the argument --gradio-img2img-tool color-sketch to enable the color sketch tool, which could be helpful in img2img.
If you want to use the computer as a server and access the GUI with another computer, use the argument --listen to enable a connection from another computer. You will need to set the firewall appropriately on the server, and this is beyond the scope of this installation guide.
Next Step
That’s it! I hope you will have fun making AI images !